GitHub — cross-repo PRs & Issues
- Reading the screen
- Getting started in three steps
- 1. Register the repos you want to see
- 2. Open the view and read it
- 3. Start work on an issue from its row
- The board (experimental)
- Using GitLab
- Behind the scenes
- If nothing shows up
See open Pull Requests and Issues across several repositories on one screen. Which repo has something waiting for review, whether CI is red — all at a glance, without hopping between sessions. You choose which repos show up by registering them (just a list of owner/repo).
- A full-screen view from the toolbar’s Pull requests button (the GitHub mark).
- Shows both open PRs and Issues, grouped per repository.
- Data comes through the GitHub CLI (
gh) — it uses yourghlogin, so no token is stored in the app.
The ▶ on an issue row goes one step further: it creates a worktree for that issue and starts an agent in it, in one click.
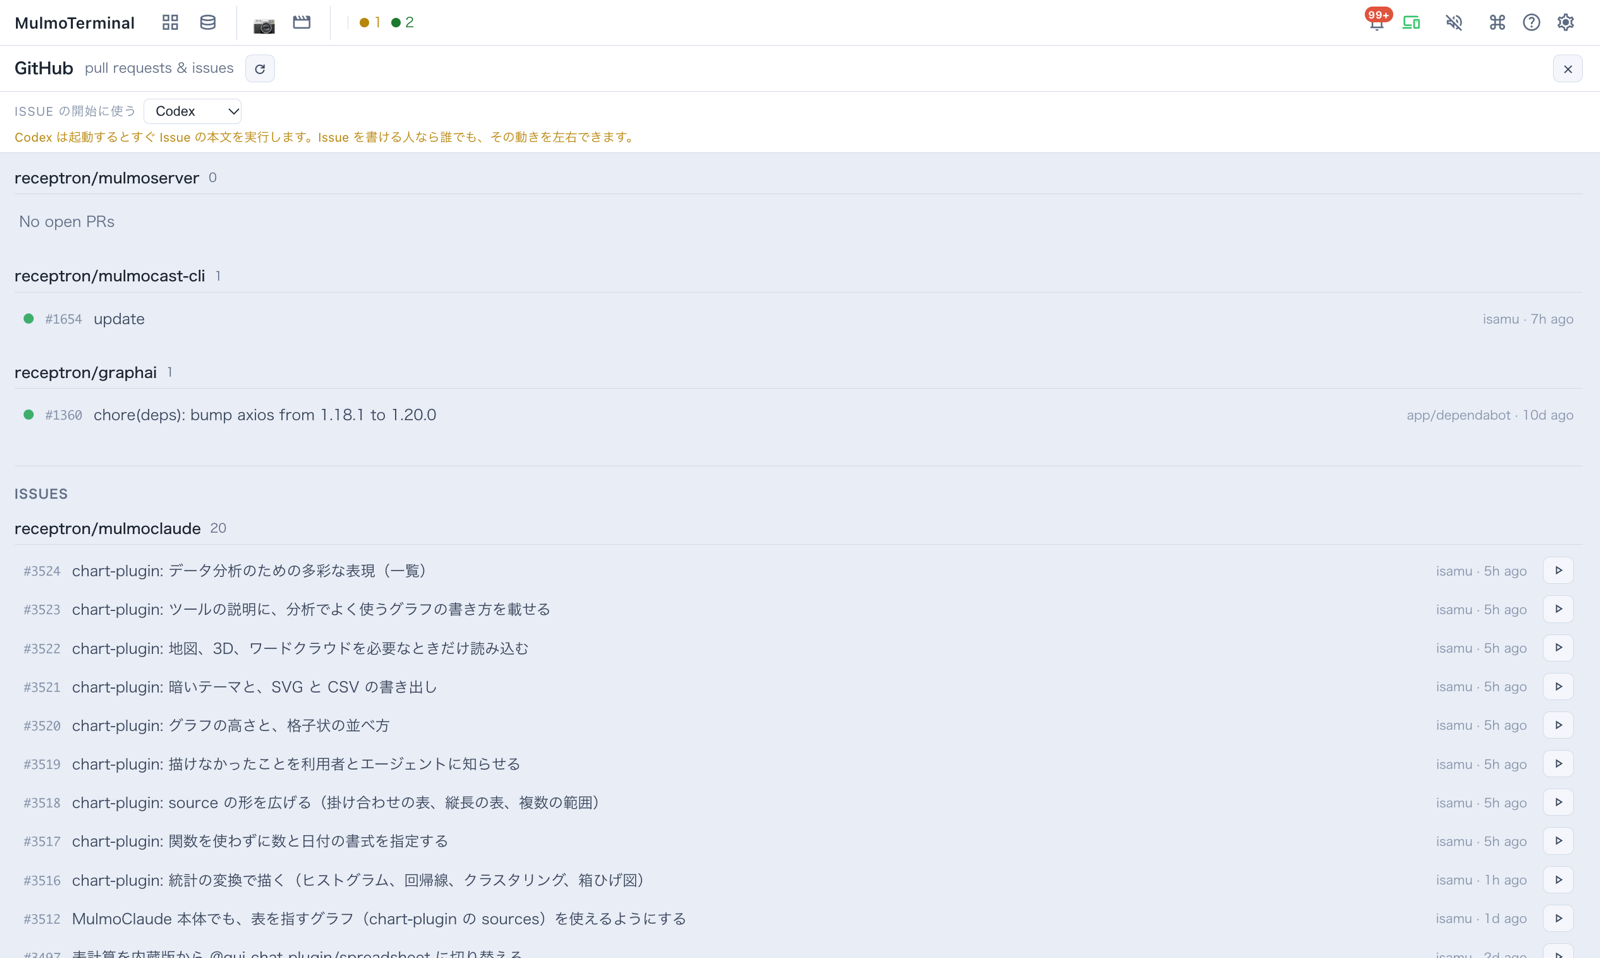
Reading the screen
From the top of the screenshot down:
| Where | What it is |
|---|---|
| Top line | The title “GitHub pull requests & issues” and the ↻ (reload) button. The ✕ at the far right closes the view (so does Esc) |
| Start issues in | The agent (Claude, Codex, …) that ▶ starts. Picking anything but Claude puts an amber warning under it (why) |
| PR list | One heading per registered repository (owner/repo and a count), with its open PRs below. A repo with none says “No open PRs” |
| ISSUES | The same, for open issues |
| ● at the left of a row | The PR’s CI state (green = passing / red = failing / amber = running / dim = no checks) |
| Right side of a row | Author and last update (e.g. isamu · 5h ago) |
| ▶ on an issue row | Start work on this issue: make a worktree and start an agent in it as a grid cell |
Clicking the row itself (its number or title) opens it on GitHub in a new browser tab.
Getting started in three steps
- Run
gh auth loginon the machine running the server — the view runs the GitHub CLI (gh) behind the scenes. The app holds no token; it uses yourghlogin as it is. - Register the repositories you want to see — type an
owner/repointo Settings → Pull request repos and add it. Details - Click the GitHub mark (Pull requests) in the grid’s toolbar — the button appears once at least one repository is registered, among the grid’s own controls shown while the grid is on screen.
From there, the ▶ on an issue row starts the work.
1. Register the repos you want to see
The repos you register appear. The one exception: a GitHub repo you have not registered shows, tagged not registered, while a terminal is open in a clone of it (the lists, the board). Two ways; a repo added in Settings takes effect immediately (no restart).
From the Settings modal (recommended)
- Open Settings → Pull request repos.
- Type an
owner/repo(e.g.receptron/mulmoterminal) and click Add. - Added repos are listed; remove any with its ✕.
The format is
owner/repoonly (no spaces, paths, orhttps://…). The value is passed straight togh --repo, so only a bareowner/reposlug is valid.
By editing the config file
Add to prRepos (an array of "owner/repo" strings) in ~/.mulmoterminal/config.json:
{
  "prRepos": ["acme/web", "acme/api"]
}
After a hand edit, press Settings → Reload config file or restart the server to apply it.
GitLab projects can be listed too. → Using GitLab
→ See Configuration for the full key list.
2. Open the view and read it
- A Pull requests section on top, an Issues section below. Both are grouped per repository (an
owner/repoheading with a count). - Only open items are shown. Order is your registration order (repos) and whatever
ghreturns (items). - A GitHub repo you have not registered shows too while a terminal is open in a clone of it (on any branch), after the registered ones and tagged not registered. One
ghcannot read is left out with no error, and it leaves on the next read after its last terminal closes. The command palette’s PR / issue entries include it as well, a little later, since the palette keeps what it read for a few minutes. - Clicking a row opens it on GitHub in a new tab (nothing opens in-app).
- ↻ (Reload) at the top re-fetches. There is no auto-refresh — it loads once when you open the view, then only on Reload.
What a PR row shows
| Element | Meaning |
|---|---|
| ● CI dot | green = checks passing / red = failing / amber = running / dim = no checks |
| #number · title | the PR number and title |
| draft | shown for draft PRs |
| approved / changes requested / review required | review state |
| author · relative time | e.g. alice · 2h ago (last updated) |
An Issue row shows #number · title · author · relative time, plus a ▶ start button on the right — see below.
Up to 100 PRs / 20 Issues per repo. Beyond that, a “there are more” note appears with a link to GitHub.
3. Start work on an issue from its row
The ▶ button at the end of an issue row does the whole setup in one click:
- reads the issue (title and body),
- creates a
issue/<number>-<slug>worktree in your clone of that repo, forked from a freshly fetchedorigin/<base>, - starts Claude in that worktree as a grid cell, with the issue already typed into the input box — and not sent. You read it, edit it if you like, and press Enter yourself.
Choosing the agent. The Start issues in menu above the list picks which agent that is — Claude by default (or your defaultAgent), remembered in this browser. For Claude or Codex with accounts configured, an Account menu beside it picks the login. An agent that is not installed here is listed but disabled. Every agent but Claude runs the issue text as soon as it starts — it has no input box to leave a draft in — and all but Codex also approve their own tools, so the view keeps a warning on screen while one of them is picked. An issue that already has a session resumes it as the agent and login it was started with, whatever the menu says.
Because the branch carries the issue number, everything downstream follows without being told again: the ⧉ Open PR button writes Fixes #<number> into the PR body, and the header’s work-item chip, the issue work comment and the merge-time auto-close all read the same number.
If you keep several clones of one repo, the button asks which one the first time and remembers your answer (repoDirs in the config); after that it is one click. If you have no clone of that repo, the button is disabled and says so — register the directory in Settings → directory presets to enable it.
Pressing it again for the same issue does not make a second worktree. One issue has one worktree: the existing one opens, along with the session left in it if there is one. If that session is still open in another terminal, nothing happens and the button says so — the same one-session-per-worktree rule as everywhere else.
The issue body is text written by whoever opened the issue, which is often not you. That is why it is left in the input box rather than sent: the Enter is yours. A resumed session gets nothing typed into it — it already has a conversation of its own.
The board (experimental)
Open the board (experimental), above the list, opens a board with one card per piece of work in the columns To do / Implementing / In review / Ready (QA) / Merged. A card carries the issue, the PR that closes it, the branch, and the terminals open on that branch.
Only work with an open terminal, in the board’s header, is on from the start. While it is on, only the cards with a terminal open are shown, and columns and repositories with no card are hidden (a repository with a terminal on its default branch stays, for its row — see below). A merged card still shows while a terminal is left on it, so you notice what is left to tidy. Turn it off to see everything, the unstarted issues included. This browser remembers the choice.
- A terminal open in a clone of a GitHub repository you have not added under Pull request repos shows too (when
ghcan read that repository; otherwise it is left out with no error), with that repository tagged not registered. It is listed after the registered ones, only while the switch is on, and leaves with its last terminal. - A terminal on the default branch (
mainand so on, when GitHub tells the board which it is), or on no branch at all, is on no card: it shows in a row above that repository’s columns, grouped by branch. - A terminal you close leaves its card at once. One you open shows a few seconds later, when the board reads itself again — wherever it was opened, the phone included.
- A terminal whose browser went away stays on its card while the server still runs it, until it is reaped.
- GitHub repositories only.
Using GitLab
An entry may also name its host — "gitlab.com/group/project". GitLab projects are read too, with glab in the same role gh plays for GitHub: the list, starting work from an issue, work comments, and opening a merge request all work. GitLab groups nest, so gitlab.com/group/sub/project is fine. A bare owner/repo still means github.com, so nothing you already have changes.
An entry on any OTHER host shows a row naming that host, rather than silently contributing nothing.
One difference worth knowing: a GitLab row’s CI dot is usually blank, because GitLab’s merge-request list carries no pipeline status and reading it costs one call per merge request. A cell watching a single branch does read it, so the phase pill in the cockpit is accurate.
A GitLab of your own (self-hosted)
gitlab.example.com cannot be recognised from its address — nothing in the name says whether that host runs GitLab, Gitea or a wiki. So you say so once, in the same file:
{
  "gitlabHosts": ["gitlab.example.com"],
  "prRepos": ["gitlab.example.com/group/project"]
}
You can also add the host without editing the file: Settings → GitHub and GitLab → Self-hosted GitLab, which takes effect at once, with no restart.
A declared host then behaves exactly like gitlab.com: the list, starting work from an issue, work comments, and opening a merge request. Two things it needs:
glablogged in to that host —glab auth login --hostname gitlab.example.com. This app stores no token of its own; it runs yourglab, the same arrangement asgh.- Reload config file in Settings, or a server restart, after editing
config.jsonby hand — the same asprReposwritten by hand. (Adding the host in Settings needs neither.)
Until the host is declared, its row says so and names the key to add. Not covered yet: a port in the host name (gitlab.example.com:8443), an http-only instance, and GitHub Enterprise.
Behind the scenes
- The app stores/reads no token — it works with your
ghlogin. - Repos always come from server-side config (never from the request).
- Each repo is fetched in parallel; only a failing repo shows its error (the others still load).
If nothing shows up
- No GitHub mark in the toolbar → no repository is registered yet, or a view other than the grid is on screen.
- “No repositories configured…” → nothing registered yet. Add
owner/repounder Settings → Pull request repos. - “gh not found…” → install the GitHub CLI and run
gh auth login. - One repo errors → check the spelling (
owner/repo) and yourghaccess to it (private repos need permission). - A PR you just opened is missing → there’s no auto-refresh, so hit ↻ Reload. Still missing? Confirm it’s open and the
owner/repois right. - Counts are capped → the limits are 100 PRs / 20 Issues per repo; see the rest via the GitHub links.