Customizing the header
- 1. Read the header first
- 2. Add your first button
- 3. Icons and tooltips
- 4. The four
runtypes - 5. From here on, look it up
- See also
When the only way to run something is to type it into the terminal, you type it dozens of times a day. MulmoTerminal lets you put your own buttons on the header of a running session: a few lines of config, and sending /compact, running the tests, or opening the team wiki all become one click.
This page starts from adding your very first button. The full field reference lives in Configuration → customizing the header.
1. Read the header first
Here is a cell with nothing configured. The header has two rows.

| Where | What’s there | What config changes |
|---|---|---|
| Row 1, left | the status dot and info chips like ⎇ main | chips reorders, hides and adds |
| Row 1, right | expand / set aside / close — cell actions | not configurable (app structure) |
| Row 2, left | ~/acme-api ▾ — the path menu (below) | not configurable |
| Row 2, right | the Skill dropdown and a row of icon buttons | buttons lands here |
The right-hand side of row 2 is what you customize. Of the small icons to the right of Skill (the lightning-bolt icon) above, the leftmost paperclip is the only default button (Insert a file path); the rest are fixed app controls.
There are only two default buttons — Insert a file path, and Open this branch’s PR (which appears only when the branch has an open PR). Reveal in the file manager, Browse files in the app, New terminal here and the GitHub links used to be here and have moved into the path menu below.
The path menu — anything to do with the directory
The path on the left of row 2 (~/acme-api ▾) is a button. It opens the actions that apply to this cell’s directory.

When the repository’s remote resolves to GitHub, Repository / Issues / Pull requests / Actions appear below a divider. This menu is fixed and config does not change it — if you want one of these as a button too, write it yourself in buttons and you get both.
2. Add your first button
Which file to write in
| File | Applies to |
|---|---|
~/.mulmoterminal/config.json | every terminal |
<project>/.mulmoterminal.json | only cells opened in that directory |
Buttons appear on AGENT cells — every entry in the Agent Picker. A terminal started from a launcher chip, a Shell cell or a Run command shows none of them: it is your own command line, and nothing this app configures is added to it.
Starting per-project is the safer experiment. Create .mulmoterminal.json in the project root:
{
  "buttons": [
    {
      "id": "compact",
      "icon": "compress",
      "label": "Compact this conversation",
      "run": "input",
      "text": "/compact"
    }
  ]
}
No server restart is needed. The header is re-read when the working directory, session or agent changes, and when the browser window regains focus — so save in your editor, switch to the browser, and it’s there.
What pressing it does
run: "input" types /compact into the Claude / Codex running in that cell and submits it — the same thing you’d do by switching to the terminal and typing, in one click.
The trap — writing buttons replaces the defaults
Writing buttons anywhere replaces the whole built-in set (it is not merged on top). Write only the example above and Insert a file path disappears. List it yourself if you want to keep it:
{
  "buttons": [
    { "id": "pick-file", "icon": "attach_file", "label": "Insert a file path", "run": "open", "open": { "pickFile": true } },
    { "id": "compact", "icon": "compress", "label": "Compact this conversation", "run": "input", "text": "/compact" }
  ]
}
3. Icons and tooltips
This is what trips people up first.
label is not drawn on screen. A button renders only its icon, and label becomes the tooltip you get on hover (the browser’s own).
So label is your only way to say what a button is. Prefer a phrase that names the action — Run the tests, not Build — because nobody reads it until they hover.
| Key | Role |
|---|---|
icon | a Material Symbols name (compress, science, menu_book, …). The only thing drawn |
emoji | a single emoji; wins over icon |
label | required. The hover tooltip, and the accessible name (aria-label) |
With neither icon nor emoji, you get bolt (a lightning bolt). A row of identical bolts tells you nothing, so always set icon.
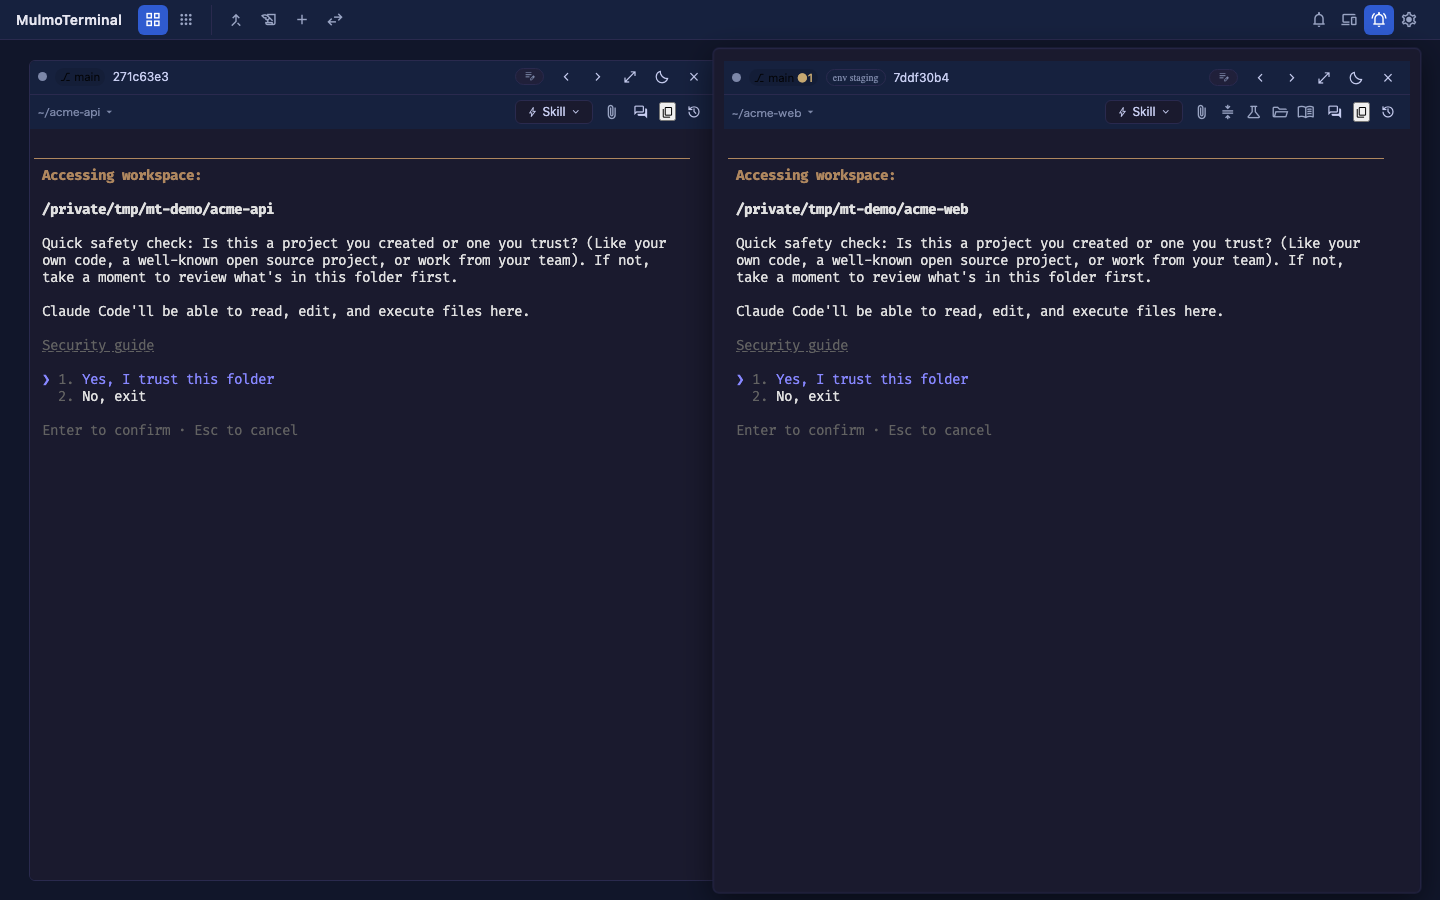
Below is a header with five buttons configured. Note that not one of them shows any text.

Side by side with an unconfigured cell — unconfigured on the left, the config above on the right:
4. The four run types
run decides what a button does. There are only four.
run: "input" — send it to the agent
Types text into the session and submits it. For slash commands and prompts you repeat.
{ "id": "compact", "icon": "compress", "label": "Compact this conversation", "run": "input", "text": "/compact" }
run: "shell" — run a command
Runs cmd in a command cell, leaving the agent’s session undisturbed.
{ "id": "test", "icon": "science", "label": "Run the tests", "run": "shell", "cmd": "yarn test" }
Pressing it opens a cell like this and shows the output:
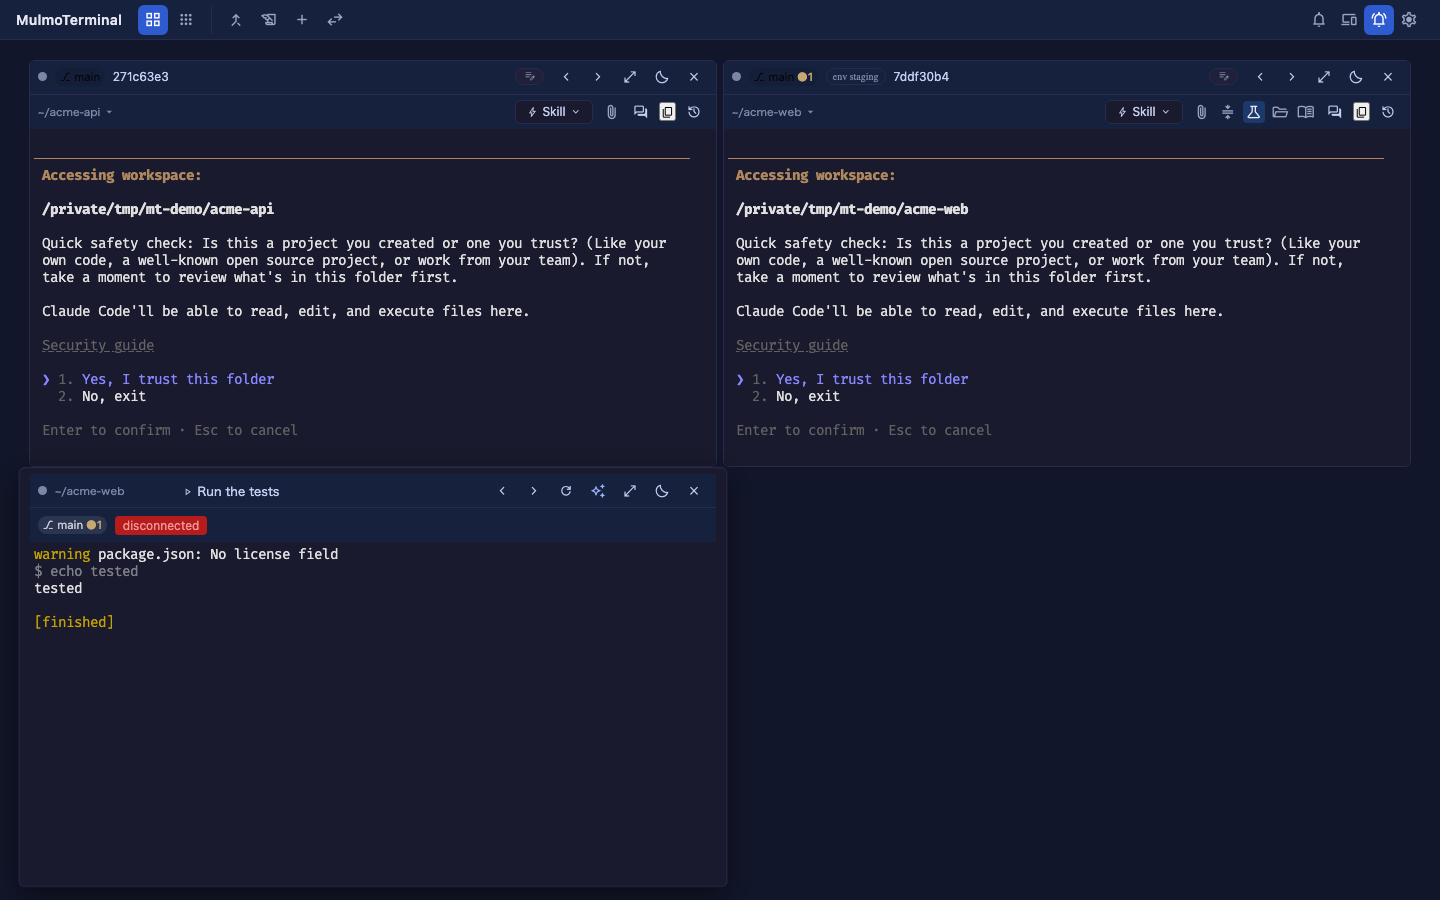
cmdnever reaches the browser. On click the server looks it up again byid, shell-escapes the${variables}, and runs that.
run: "open" — open something
One key inside open decides what opens.
The table is also the precedence if you write more than one — highest first.
| Key | Opens |
|---|---|
pr | the current branch’s PR in the browser (the button hides itself when there is no PR). The server resolves it into url, so it beats an explicit url written alongside it |
url | a URL in the browser (http / https only) |
reveal | the OS file manager (Finder / Explorer / xdg-open) |
files | the in-app file explorer |
view | an in-app view: prs / wiki / collections / accounting. (diff is accepted but has no dedicated screen yet and opens the files view — reach a worktree’s diff from the diff badge instead) |
terminal | a new terminal cell in that directory |
pickFile | the OS file dialog, inserting the chosen path into the prompt |
{ "id": "handbook", "icon": "menu_book", "label": "Open the team handbook", "run": "open", "open": { "url": "https://example.com/handbook" } }
Write only one per button. Set several and only the first in that order takes effect; the rest are silently ignored.
run: "action" — restart the agent in this cell
Acts on the cell itself. One action so far:
{ "id": "restart", "icon": "restart_alt", "label": "Restart the agent", "run": "action", "action": "restart" }
"restart" ends the agent process and starts it again in the same cell, in the same directory, on the same conversation — no going back to the launcher to pick the directory and hunt for the session in or resume here. This is what makes a changed MCP registration, an edited ~/.mulmoterminal/config.json or an updated plugin take effect: those are read once, when the process starts.
It costs a resume, and it asks nothing first. The conversation is read back from its transcript, which costs real tokens, and the agent is killed even mid-turn. There is no built-in Restart button — this and the
terminal-restartshortcut are the two ways to have one.
5. From here on, look it up
You can build a button now. Everything past this point — the ${variables}, every when form, how the global and project files merge, chips, the Skill menu, and recipes to paste — lives in the header reference. That page is not meant to be read top to bottom; it is meant to be looked up while you write.
| What you want | Where |
|---|---|
what ${dir} or ${task} holds, and when it is empty | ${variables} |
the conditions (!isGitRepo, !=, “has a value”) | when |
| how the global and project files combine | ordering and merging |
| reordering and adding the row-1 info chips | chips |
| shortening the Skill menu | the Skill menu |
a whole .mulmoterminal.json to paste | recipes |
See also
- Header reference — variables,
when, merging, chips, recipes - Configuration → customizing the header — the full field reference
- Configuration → per-project settings — colours, names, ordering: the other keys in the same file
- Configuration → “Frequent commands in the Run menu” — adding a Run menu with
script.json - The
/mulmoterminal-headerskill — if you’d rather have it written for you